You’re in integration testing and something’s not working. The mobile app can’t find your device, connections drop the moment they establish, or notifications that should be firing aren’t showing up on the other end. Your code looks right. Your debugger says the function executed. But something between your firmware and the outside world isn’t behaving the way you expect.
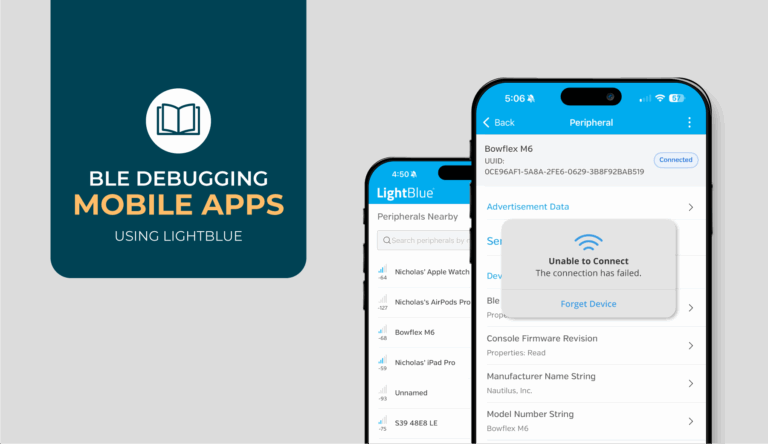
LightBlue gives you a way to see what’s actually happening. It’s a BLE central app that acts as a known-good device you can test against. Connect to your peripheral with LightBlue, and you can see exactly what your firmware is broadcasting, what your GATT table looks like to a central, whether your notifications are arriving with the right data, and how your device handles writes, pairing, and reconnection. If something works with LightBlue but fails with your production app, the bug is on the app side. If it fails with both, it’s your firmware.
This guide walks through how to use LightBlue to test your firmware’s BLE implementation step by step: what to do, what to look for, and what the results tell you about your firmware.
Note: If you’re debugging from the mobile app side, our guide on debugging BLE mobile apps with LightBlue covers the same approach from the app developer’s perspective. And if you’re new to LightBlue, the How-To Guide walks through setup and features.
Scan and Check Your Advertising Data
Open LightBlue and let it scan. The peripherals nearby screen shows every BLE device in range, and your device should be in the list. At a glance, you’ll see each device’s name (if it’s advertising one), signal strength as an RSSI value, and a connect button. Devices that stopped advertising show up grayed out, so you can tell what’s active versus what was around recently.
If your device doesn’t appear, pull down to refresh. If you’re in a busy environment with a lot of BLE traffic, use the search bar to filter by name or the sort options to bring the strongest signal to the top. If your device still doesn’t show up after refreshing, your firmware isn’t advertising.
What the Advertising Details Reveal
Tap into your device to see the full advertising data. LightBlue breaks this out in detail: the local name your device is broadcasting, service UUIDs, manufacturer-specific data, TX power level, connectable status, and a timestamp for the advertising packet. This is what every central in the world sees when your device advertises, and it’s often different from what you think you configured.

Things to check against your firmware configuration:
Device name truncated? If you configured “MyDevice” but LightBlue shows “MyDev,” your advertising buffer probably didn’t account for the null terminator. The name got truncated to fit, and any app filtering for the full string won’t find you.
Service UUIDs don’t match? A common mismatch: you’re advertising a 16-bit UUID but your GATT table is defined with the full 128-bit version, or vice versa. Copy-paste errors with transposed digits also happen more often than anyone wants to admit. If your mobile app is filtering for a specific UUID during scanning and can’t find your device, this is usually why.
Manufacturer data empty or garbage? Your firmware is likely calling the advertising API before that data buffer is initialized. The timing of when you set up manufacturer data relative to when you start advertising matters.
Connectable status shows non-connectable? Your firmware is advertising in broadcast-only mode. That’s correct for a beacon, but wrong if you need connections.
If LightBlue sees your device and the advertising data matches what you intended, your advertising works. Before assuming any app-side scanning issue is a bug, though, check scan profiles. LightBlue may use a more aggressive scan configuration (short scan interval, wide scan window) than your device.
Production apps typically use a more conservative profile to preserve battery, which means they may miss advertisements depending on your device’s advertising interval. If your app struggles to find the device during scanning but LightBlue finds it consistently, the gap may be scan parameters rather than a bug. Tightening your device’s advertising interval or adjusting the app’s scan window are both levers worth trying before you start digging deeper.
Connect and Test Connection Stability
Tap Connect on your device in LightBlue. A successful connection means your firmware accepted the connection request and the two devices completed the initial handshake. Now the question is whether it stays connected.
Leave the connection open for at least a couple of minutes. Then disconnect and reconnect. Do this several times in quick succession: connect, disconnect, connect, disconnect. This rapid cycling is one of the most useful things you can do in LightBlue, because it tests whether your firmware cleans up properly between connections.
What Connection Behavior Tells You
Connection holds stable through multiple cycles? Your firmware’s connection handling works. If your production app can’t stay connected to the same device, the problem is in the app’s connection management — parameter negotiation, state tracking, or how it handles the initial connection flow.
Drops within two to three seconds, every time? Watch the timing in LightBlue.Iif the disconnect happens at a consistent interval right after connecting, that pattern points to a supervision timeout mismatch. Your firmware’s timeout may be too short for the connection interval the central is requesting, and normal negotiation delays are exceeding it. Connect a few times and see if the disconnect happens at the same point each time. Consistent timing means a configuration issue; random timing suggests something else. As a starting point, make sure your supervision timeout is at least six times your maximum connection interval.
First connection works, second or third fails? This is exactly what the rapid connect/disconnect cycling in LightBlue is designed to catch. Connect, disconnect, connect again immediately. If the first connection is always fine but subsequent ones fail (and especially if you need to power-cycle to recover) your firmware isn’t cleaning up connection handles, buffers, or state machine variables between sessions. Try varying the pace too: does a quick reconnect fail while waiting ten seconds between attempts works? That tells you whether it’s a timing issue in your cleanup or a complete failure to reset.
Connection fails entirely? Your firmware may not be in a state that accepts connections. Your state machine hasn’t finished initialization, still in a boot-up sequence, or a more fundamental issue with your connection configuration.
If LightBlue maintains a stable connection through multiple connect/disconnect cycles and extended idle periods, your firmware’s connection handling is solid.
Explore Your GATT Table
Once you’re connected, LightBlue automatically performs service discovery and displays your complete GATT table. This is where you find out whether your services and characteristics actually look the way you designed them.

LightBlue shows a list of services, each identified by UUID. For standard BLE services, it recognizes the UUID and displays a human-readable name alongside it. This is a quick way to confirm you’re using the right standard service definitions. Tap a service to expand it and see its characteristics, each showing its UUID and supported properties (Read, Write, Notify, and so on). Descriptors are visible under each characteristic, including the Client Characteristic Configuration Descriptor (CCCD) that a central needs to write to in order to enable notifications.
Comparing Discovery Against Your Firmware
Walk through every service and characteristic LightBlue discovers and compare it against your firmware’s GATT definition. This line-by-line comparison is the whole point of this step.
Service missing entirely? You probably defined it in your firmware source but didn’t register it with your BLE stack during initialization. It’s also possible you’re hitting a service count limit in your stack configuration, which can silently prevent additional services from being registered.
UUID doesn’t match your spec? Byte order is the first thing to check. 128-bit UUIDs in BLE are transmitted in little-endian order, and it’s easy to define them in the wrong byte order in code, especially when you’re copying from a spec that lists them in standard big-endian format. Also check for simple transposed digits from copy-paste.
Properties wrong on a characteristic? If it shows Read but not Notify when you expected both, your characteristic definition in firmware doesn’t match your intent. Straightforward to fix once you see it, but confusing during integration if the mobile app tries to subscribe to something that doesn’t support it.
No CCCD descriptor under a Notify characteristic? The central won’t be able to subscribe. The Notify property on the characteristic alone isn’t enough; the CCCD has to be present for the subscription mechanism to work.
The Stale Cache Problem
One thing worth watching for: if LightBlue sees your correct, current GATT table but your mobile app sees something different or outdated, you’re probably dealing with a stale cache. When a central has previously connected to your device, it may cache the GATT structure to speed up future connections. If you’ve updated your firmware and changed the table, the app might still be working with the old cached version. LightBlue does fresh discovery every time, so it always shows the current truth. The fix is on the app side (clearing cached GATT data), but it’s typically a firmware change (restructuring the GATT table or changing UUIDs) that triggers the problem. For a deeper look at how GATT caching works and where it tends to go wrong, see our breakdown of attribute caching in BLE.
If LightBlue discovers your complete, correct GATT table with the right UUIDs, properties, and descriptors, your firmware’s service definitions are solid.
Subscribe to Notifications and Watch What Arrives
Find the characteristic you want to test and tap into its detail view. If it supports notifications, you’ll see a subscribe button (look for a bell icon). Tapping it tells LightBlue to write to the CCCD and enable notifications from that characteristic. Once subscribed, trigger whatever event on your firmware should generate a notification (a sensor reading, a state change, a timer firing) and watch LightBlue.
LightBlue displays each notification as it arrives in real time. You can toggle the data format using the selector in the upper right corner, switching between hex, ASCII, and numeric views to see the payload; however it’s most useful. Notifications keep arriving even if you navigate away from the characteristic screen, as long as the connection stays open.
Testing Under Load
Start with a single notification. Trigger one event and confirm it shows up in LightBlue with the data you expect. Then ramp up:
Burst test: Trigger five to ten notifications in rapid succession and count how many arrive. If you send ten and only three or four show up, you’re hitting buffer limits. Your BLE stack’s transmit buffer is filling up faster than it can send, and notifications are either getting overwritten or silently dropped.
Sustained load: Trigger continuous high-frequency notifications and watch for where things start to break down. This is exactly the kind of issue that doesn’t surface in single-notification testing and only shows up under real-world conditions.
Interpreting What You See
Every notification arrives as expected? Your notification path works end to end. If your mobile app isn’t getting the same notifications, the problem is app-side, either callback registration, CCCD subscription, or OS-level throttling when backgrounded.
Nothing arrives at all? Your firmware may be trying to send before the central has subscribed. Your code calls the send function, your debugger shows it executed, but if the central hasn’t written to the CCCD yet, the notification has nowhere to go. Some stacks silently drop it. Others queue it and never transmit.
Data looks wrong? Toggle formats in LightBlue to look at the raw bytes. Most common cause: endianness or you’re sending a uint16_t, but the bytes arrive in the wrong order. Struct packing can also bite you if your compiler inserted padding bytes you didn’t expect. Another subtle one: if data is sometimes correct and sometimes garbage, you may have a buffer that gets overwritten between when you queue the notification and when it actually transmits.
If LightBlue receives every notification with correct data under single, burst, and sustained conditions, your notification implementation works.
Write Values and Verify Firmware Response
Select a writable characteristic and tap into its detail view. LightBlue gives you a write interface where you can enter data in hex, ASCII, or numeric format and send it to your device.
One thing worth noting upfront: LightBlue always uses write-with-response. You can’t toggle to write-without-response, so your firmware will always need to send an acknowledgment. If your characteristic supports both write types, keep in mind that you’re only testing the write-with-response path here.
Verifying Basic Write Handling
Start by writing a known byte sequence, something you can easily verify on the firmware side through your debugger, UART output, or the device’s behavior. Then read the characteristic back. If it supports Read, LightBlue lets you read the current value right after writing, giving you a round-trip confirmation that your firmware stored what you sent.
Test endianness explicitly. Write a known uint16_t value in hex, like 0x0100, and check what your firmware reads. If it interprets that as 256 instead of 1, your byte order is flipped. This bug can hide for months because it only matters when the value is large enough for the byte order to produce a visibly wrong result.
Pushing the Limits
Gradually increase the size of your write payloads. As you approach the MTU limit for the connection, buffer handling bugs tend to surface. If your firmware crashes, returns an error, or corrupts data near the MTU boundary, you have a buffer overflow or an off-by-one error in your payload handling.
If a write-with-response times out in LightBlue, your firmware isn’t sending the acknowledgment. Its either not generating the ACK at all, or taking so long to process the write that the central gives up waiting. If you’re doing heavy work in your write handler (validating data, updating state, writing to flash), consider whether that processing can happen asynchronously so the ACK goes back promptly.
Testing Error Handling
Write deliberately malformed data (wrong length, invalid values, garbage bytes). Does your firmware return an appropriate BLE error code, or does it crash, hang, or enter a state that requires a power cycle? A firmware that can be wedged by a bad write is a firmware that will be wedged in production.
If writes work correctly in LightBlue across a range of payloads and edge cases, your write handling is solid. If your mobile app’s writes fail against the same device, the app is either serializing data incorrectly or handling the write operation wrong.
Test Pairing and Reconnection
Connect to your device in LightBlue and trigger the pairing process. How this happens depends on your firmware’s security configuration. Some devices initiate pairing on connection, others trigger it when a central tries to access an encrypted characteristic. Either way, LightBlue handles the pairing flow from the central side.
The Full Lifecycle Test
The real test isn’t whether pairing works once. It’s whether the full lifecycle works. Run through this sequence:
- Connect and complete pairing.
- Read or write to a characteristic that requires encryption. If the operation succeeds, the encrypted connection is working.
- Disconnect.
- Reconnect. Does LightBlue reconnect without requiring full re-pairing? If so, your firmware recognized the bonded device and restored the encrypted connection using stored keys.
- Disconnect again, power cycle your device, and reconnect. This is the test that breaks most bonding implementations.
What Failures Reveal
Reconnection requires re-pairing (without power cycle)? Your firmware isn’t persisting bonding keys to non-volatile storage. The keys were in RAM and they’re gone on disconnect.
Reconnection works until you power cycle? The keys aren’t being written to persistent storage correctly, or your firmware isn’t loading them on boot. This is one of the most common security implementation bugs, and it’s easy to miss during development because you tend to test without power cycling.
Pairing works once but fails on retry? Your firmware’s pairing state machine isn’t cleaning up after a completed or interrupted attempt. State from the previous pairing is still lingering. If you have to power-cycle to pair again, that’s the giveaway.
Reconnection fails even though keys are stored? Your firmware may not be looking up bonding data on reconnection. It’s treating every incoming connection as a new, unbonded device instead of checking whether it already has keys for this central.
If LightBlue can pair, disconnect, power cycle your device, and reconnect successfully using stored bonding information, your firmware’s security implementation works.. If your mobile app can’t do the same, the bug is in the app’s pairing flow or bond management.
Use the Log to Catch What the UI Doesn’t Show
LightBlue’s Log tab records every BLE event like connections, disconnections, service discovery, reads, writes, notifications, and errors in the order it happened with timestamps. Most of the debugging in this guide relies on what you see in the UI, but the log is where timing and sequencing issues become visible.
If your connection drops and the UI just shows a disconnect, the log often tells you more like whether a supervision timeout fired, whether a specific operation preceded the drop, and how long each step in the sequence actually took. If pairing fails, the log shows where in the exchange it broke down. If notifications arrive but something seems off, comparing the timestamps in the log against your expected send rate can reveal whether you’re hitting transmission delays you hadn’t accounted for.

It’s also useful for comparing event sequences between LightBlue and your production app. If both are connecting to the same firmware but behaving differently, walking through the log from LightBlue gives you a reference sequence or the order of events when everything works, which you can compare against what your app is doing.
When You Need to Go Beyond LightBlue
LightBlue covers the BLE protocol layer: advertising, connections, GATT discovery, data transfer, and security. For most firmware debugging during integration testing, that’s where the problems live.
But some problems sit below the protocol layer. RF interference or antenna design issues need a spectrum analyzer. Timing problems at the microsecond level require a logic analyzer. Power consumption optimization needs a power profiler measuring current draw at sub-milliamp resolution. And chipset-specific edge cases sometimes call for vendor debugging tools or direct access to the lower-level stack.
When Tools Won’t Cut It
Those situations need hardware-level analysis that no BLE central tool can provide. If you’re hitting issues that cross these boundaries, or dealing with complex integration problems you can’t isolate with the workflow in this guide, our team works with companies on these challenges every day. Reach out and let’s talk about what you’re building.
Where to Go From Here
The workflow here focuses on isolating firmware issues, but BLE development involves both sides of the connection. If you’re working with a mobile app team, our guide on debugging BLE mobile apps with LightBlue walks through the same approach from their perspective. Understanding both sides helps you communicate across teams and catch integration issues faster.
For deeper dives into specific areas, our guides on BLE security fundamentals, Android BLE development, and iOS Core Bluetooth provide platform-specific context that informs better firmware decisions. And for a full walkthrough of LightBlue’s features, the LightBlue How-To Guide covers everything the app can do.