
Creating user interfaces (UI) that are both seamless and intuitive is one of the trickiest hurdles faced when building custom-embedded solutions. It’s not just about making things look good; it’s about creating an experience that feels natural to the user, all within the tight constraints of embedded systems. This challenge is particularly close to our hearts at Punch Through, where we partner with medical device manufacturers and consumer IoT startups, pushing the boundaries of what’s possible.
We’ve compiled some tips from our own team’s experiences aimed at helping you navigate the complexities of using LVGL (Light and Versatile Graphics Library) and PlatformIO to build your embedded UIs. We’re sharing our learnings to help you overcome these challenges and excel, ensuring your projects result in robust, user-friendly, and scalable solutions.
If you need a partner with the expertise to accelerate embedded development and realize your connected product vision at any point in your IoT development journey, let’s talk. Punch Through is here to help.
Now, without further ado, let’s dive into our top 5 tips for building embedded UI using LVGL and PlatformIO:
1. Leverage platform independent design
The Light and Versatile Embedded Graphics Library (LVGL) has a remarkably versatile, platform-independent design. Sooner or later, however, your application will need to interact with some platform specific features to do its actual work. How you go about integrating your business logic with your user interface has huge implications for the flexibility and long-term maintainability of your design.
It’s good to think about this from the start of the project. Even if you find yourself in a situation — as we have on a recent project — where the context of the original design and implementation has been lost, it’s still possible to massage good interfaces into the code as you work and discover its functionality.
Building a clean, testable, platform-independent UI starts with defining a clean interface with your business logic. This can involve a fair amount of discovery work related to the domain, especially when working in an existing code base.
In our case, we decided to port an existing code base to LVGL from a smaller, manufacturer-provided graphics library that lacked good documentation and many desirable features.
We’d already been working on the project for some time and had a good understanding of the domain and scope of the application. We’d also already begun to decouple business logic and UI code in many places. One of the features that attracted us to LVGL in the first place was the ability to emulate the UI on our desktop by compiling the application for — in our case — Windows. A task for which the abstractions we had built so far were not sufficient.
Our board had several buttons for user input, a 320×240 pixel display, and a SPI bus where we communicated with a nordic SoC to handle Bluetooth functionality. In essence, our application had three interfaces:
- Button input
- Display output
- Application-specific input/output over SPI using a virtual register set
Abstracting the first two is relatively straightforward using LVGL. Display and input in LVGL are handled using drivers. In this context, these are small bits of code which implement LVGL interfaces in a hardware-specific way. For example, our display driver implements a callback function which takes pixel values from a draw buffer in memory (managed by LVGL) and writes them to the display hardware. It looks something like this:
/** @file display.c */
/** #includes... */
/** LVGL recommends 1/10th screen size buffer as a starting point
 */
#define DRAW_BUFFER_SIZE (LCD_WIDTH * LCD_HEIGHT / 10)
static lv_disp_draw_buf_t draw_buffer;
static lv_color_t buffer[DRAW_BUFFER_SIZE];
static lv_disp_drv_t lcd_driver;
static lv_disp_t *lcd_display = NULL;
static void flush_display(lv_disp_drv_t *driver, const lv_area_t *area,
                          lv_color_t *color_data);
lv_disp_t *display_driver_init(void) {
  /** Register driver with LVGL */
  lv_disp_draw_buf_init(&draw_buffer, buffer, NULL, DRAW_BUFFER_SIZE);
  lv_disp_drv_init(&lcd_driver);
  lcd_driver.draw_buf = &draw_buffer;
  lcd_driver.flush_cb = flush_display;
  lcd_driver.hor_res = LCD_WIDTH;
  lcd_driver.ver_res = LCD_HEIGHT;
  lcd_display = lv_disp_drv_register(&lcd_driver);
  return lcd_display;
}
static void flush_display(lv_disp_drv_t *driver, const lv_area_t *area,
                          lv_color_t *color_data) {
  /** Hardware-specific draw commands */
  uint16_t num_pixels =
      ((area->x2 + 1) - area->x1) * ((area->y2 + 1) - area->y1);
  gfx_set_limits(area->x1, area->y1, area->x2, area->y2);
  LCD_IR(ST7789S_CMD_MEMORY_WRITE);
  while (num_pixels--) {
    LCD_WD(*(uint16_t *)color_data);
    color_data++;
  }
  lv_disp_flush_ready(driver);
}
The third was more complicated. Our application relied on information from the Nordic chip to inform such things as: which pages would be available for navigation, what connection, alert, or battery status to display, and so on. Without a portable version of this layer, our UI would be useless for development/debugging purposes on Windows, as only a small subset of screens would be available. It would also be impossible to exercise the different connection, alert, or battery statuses.
Our approach, using LVGL 8.2.0 at the time, was to build a “data-binding” module that acted as an interface to the SPI virtual registers, with the added feature of being able to “bind” (subscribe) to changes for a register. We then made sure all of our UI code only accessed data through this API, which made it possible to create a separate implementation for testing on our Windows build variant.
By storing the interface header files in our common include directory, and having separate subdirectories for each platform-specific implementation, we could use PlatformIO’s build_src_filter directive to easily compile-in the version that we needed for a specific build target without muddying our code with preprocessor guards. Given the following directory structure, it looks something like this:
<pre class="wp-block-syntaxhighlighter-code">├───include/
│    └───model/
└───src/
     └───model/
          ├───atmel/
          └───sdl2/</pre>
; @file platformio.ini
[env:atmel]
build_src_filter =
+<*> ; include all sources
-<model/sdl2> ; except sdl2 specific implementations
[env:sdl2]
build_src_filter =
+<*> ; include all sources
-<model/atmel> ; except atmel specific implementationsI mentioned we were using LVGL 8.2.0 at the time. The reason being is that LVGL 8.3.0 and onward actually include a publisher/subscriber style messaging module that offers similar functionality to the API we built from scratch. If we were to go back and redesign our platform abstraction, I would highly consider using the LVGL messaging library to build our data interface as it’s more generic and flexible to different use cases. It would also benefit from the high volume of testing that occurs across the community of developers and users of LVGL. It’s been our experience that the community is quite active and bugs are found and fixed quickly.
2. Use composition and hierarchy to avoid repetition
When building a user interface, you’ll inevitably come across the need for a common set of functionality to be replicated across multiple screens in your application. LVGL facilitates two good approaches to this while minimizing code duplication, each useful in a slightly different scenario.
Hierarchy
In our project, there were two components we wanted to show on every screen: a status bar for information, such as connection state and battery level, and a page indicator showing where the user is in the UI relative to other available pages. We wanted to avoid repeating the code for these on every screen. To accomplish this, we used the object hierarchy and a feature called “fragments” to our advantage.
LVGL, like many higher-level UI libraries, represents the objects to be rendered as a hierarchy. E.g.
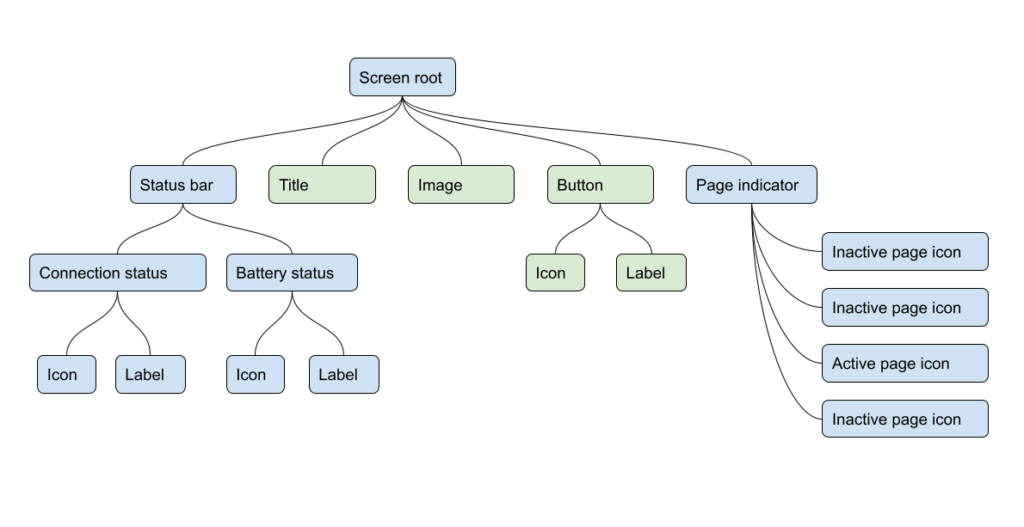
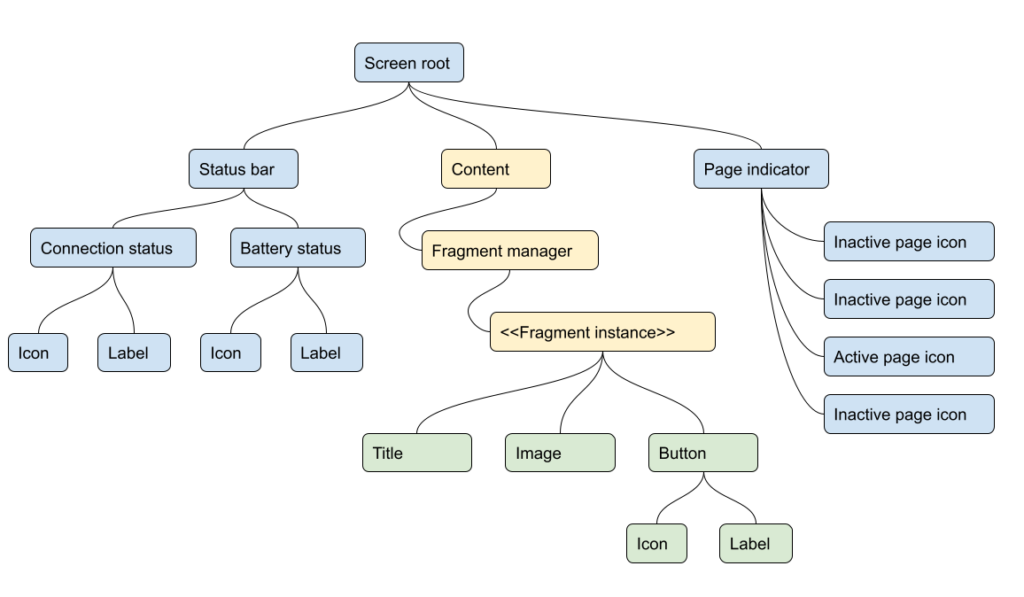
While we could do this for every screen, the following hierarchy allows us to define the status bar and page indicator once — at the top level, and then omit any reference to it whatsoever from each “child screen” – represented by fragments.
Composition
We also encountered the challenge of trying to reuse widgets that were not top-level components and, unlike the status bar, could not just be moved up the hierarchy. For these cases, we instead built new, composite widgets by combining several base widgets.
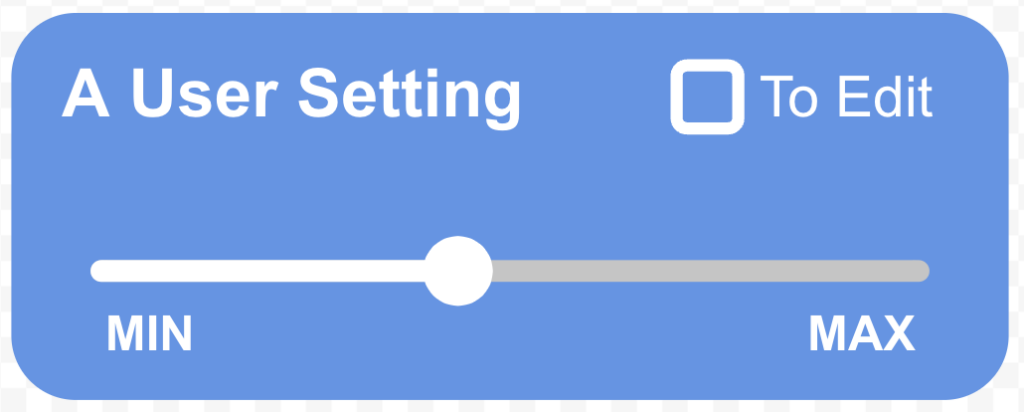
For example, in our application, we needed to make a slider control that is modal (as in edit modes, not modal dialogs). The user needed to be able to navigate between sliders on a page using arrow keys and also change the value of a selected slider using those same keys. We also wanted to display a label, the current mode, and range of the slider.
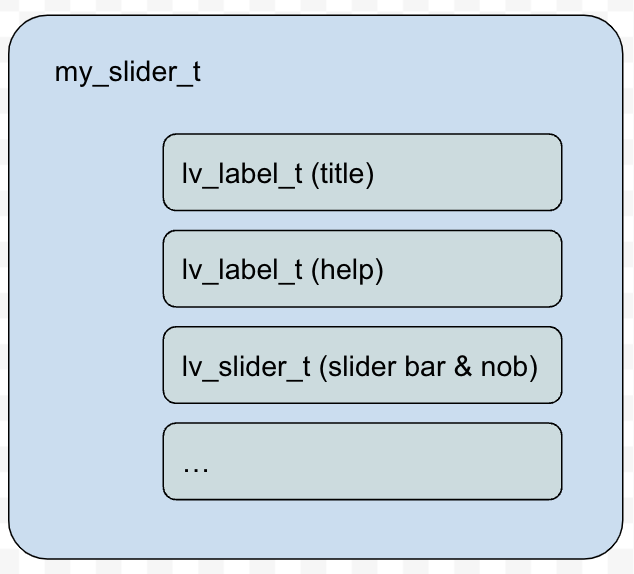
To accomplish this, we created a module to encapsulate the new composite widget. In it, we followed the pattern of the many included widgets for compatibility and consistency of interface. This included defining a constructor and any behaviors we want to access when we use the widget, such as setting the labels for title or range limits, the current mode, and so on.
/** @file my_slider.h */
#include <lvgl.h>
#include <stdint.h>
typedef void (*my_slider_cb_t)(int32_t);
typedef struct {
  /** Properties for root object of instance */
  lv_obj_t *obj;
  /** 'my_slider' specific properties */
  lv_obj_t *title_label;
  lv_obj_t *help_label;
  lv_obj_t *slider;
  lv_obj_t *min_label;
  lv_obj_t *max_label;
  my_slider_cb_t slider_value_changed_cb;
  my_slider_cb_t slider_locked_cb;
  uint8_t step_size;
} my_slider_t;
/**
 * @param[in] parent  Slider's container
 *
 * @return Pointer to the root object of the slider widget
 */
lv_obj_t *my_slider_create(lv_obj_t *parent);
/**
 * @param[in] slider The my_slider_t instance of which to set the title
 */
void my_slider_set_title(lv_obj_t *slider);
/** additional property setters/getters... */
In the implementation, we allocated a root lv_obj which became the handle to the composite widget and served as the parent object for all the sub-components.
/** @file my_slider.c */
#include "my_slider.h"
#include <core/lv_obj_class.h>
#define MY_CLASS &my_slider_class
const lv_obj_class_t my_slider_class = {.constructor_cb = my_slider_constructor,
                                        .destructor_cb = my_slider_destructor,
                                        .event_cb = my_slider_event,
                                        .width_def = LV_SIZE_CONTENT,
                                        .height_def = LV_SIZE_CONTENT,
                                        .instance_size = sizeof(my_slider_t),
                                        .base_class = &lv_obj_class};
lv_obj_t *my_slider_create(lv_obj_t *parent) {
  lv_obj_t *obj = lv_obj_class_create_obj(MY_CLASS, parent);
  lv_obj_class_init_obj(obj);
  return obj;
}
static void my_slider_constructor(const lv_obj_class_t *class_p,
                                  lv_obj_t *obj) {
  my_slider_t *slider = (my_slider_t *)obj;
  slider->title_label = lv_label_create(obj);
  slider->help_label = lv_label_create(obj);
  slider->slider = lv_slider_create(obj);
  /** ...initialize fields... */
  slider->step_size = 1;
}
static void my_slider_destructor(const lv_obj_class_t *class_p, lv_obj_t *obj) {
  /** free memory allocated with lv_mem_alloc(), etc. */
}
static void my_slider_event(const lv_obj_class_t *class_p, lv_event_t *e) {
  lv_res_t res;
  /** Call base class event handler first */
  if (lv_obj_event_base(MY_CLASS, e) != LV_RES_OK) {
    return;
  }
  lv_event_code_t code = lv_event_get_code(e);
  lv_obj_t *slider = lv_event_get_target(e);
  /** Custom event handling */
  if (lv_obj_has_state(slider, LV_STATE_CHECKED)) {
    /** Slider is in edit mode */
    int val = lv_slider_get_value(slider->slider);
    if (lv_indev_get_key(lv_indev_get_act()) == LV_KEY_LEFT &&
        val > lv_slider_get_min_value(slider->slider)) {
      val -= slider->step_size;
    } else if (lv_indev_get_key(lv_indev_get_act()) == LV_KEY_RIGHT &&
               val < lv_slider_get_max_value(slider->slider)) {
      val += slider->step_size;
    }
    // Notify listener of new value
    if (slider->slider_value_changed_cb != NULL) {
      slider->slider_value_changed_cb(val);
    }
  }
  if (lv_indev_get_key(lv_indev_get_act()) == LV_KEY_ENTER) {
    /** Transition between active and inactive state when enter key is pressed
     */
    if (lv_obj_has_state(slider, LV_STATE_CHECKED)) {
      lv_obj_clear_state(slider, LV_STATE_CHECKED);
      lv_obj_add_flag(slider, LV_OBJ_FLAG_EVENT_BUBBLE);
      lv_label_set_text(slider->tip_label, UI_STR_SLIDER_INACTIVE_TIP);
      if (slider->slider_locked_cb != NULL) {
        slider->slider_locked_cb(lv_slider_get_value(slider->slider));
      }
    } else {
      lv_obj_clear_flag(slider, LV_OBJ_FLAG_EVENT_BUBBLE);
      lv_obj_add_state(slider, LV_STATE_CHECKED);
      lv_label_set_text(slider->tip_label, UI_STR_SLIDER_ACTIVE_TIP);
    }
  }
}
We then created instances of our custom widget in much the same way as any built-in LVGL widget, and used them throughout our application.
3. Use relative screen coordinates
It may be tempting to think you can rely on absolute screen coordinates for UI layout, especially in an embedded system where you control the specifications of the hardware and the number of variants that you need to support.
Based on our experience, I would stress that it’s well worth the effort to ensure that your UI is responsive to different screen resolutions by design. Even in this environment, project requirements can change, and you can have your hands forced by the hardware supply chain.
On our project, we experienced both to some degree. Shortly after taking over the project, we became aware of requirements for a second remote device with a smaller screen resolution. There was also a looming threat of supply issues with the display that was used in the current iteration of hardware. It was clear that much of the existing display code was dependent on hardware details and specific screen coordinates. In other words, there would be significant work required to port to a different display, including on-going maintenance burden, which increased our motivation to adopt LVGL.
Here are a few ways we modified our code, leveraging LVGL, to make our application responsive to different screen sizes and resolutions:
3A. Layouts
Remove almost all necessity for specifying screen coordinates. Instead, define a hierarchy of containers and specify how you want the children to be organized inside each container. Then, tweak component sizes until you like them and viola! You have a responsive UI (provided you specify the sizes in relative units, more on that below).
LVGL has two layout rules to choose from, each with numerous tuning options:
- FLEX – a relative layout where each child component takes as much space as they need and each sibling is placed immediately after the one before it in the direction specified by the rule.
- GRID is a more rigid layout in which table rows and columns are defined upfront, and child components are organized into them explicitly.
3B. Specify sizes relative to the parent object or content/children.
- LV_PCT(x)
Specifies a percentage that will be evaluated as pixel scale coordinates relative to the size of the parent object. Can be thought of as “percent of parents size.” - LV_SIZE_CONTENT
Specifies that the widget should be sized just large enough to fit its contents along the specified dimension.
3C. Specify pixel values in percentage of vertical or horizontal resolution.
In the absence of feature support in LVGL (LV_PCT(x) is relative to the parent object, which is useful but not always what you want), we used the following macros to accomplish this, where LCD_WIDTH and LCD_HEIGHT can be defined at build time for each hardware variant, and are also used to set the screen resolution passed to LVGL.
/** @breif Compute pixel values as a percentage of the
 * display's horizontal resolution.
 */
#define H_NORM_PX(h_scr_percent) ((int16_t)((LCD_WIDTH / 100.0) * (h_scr_percent)))
/** @breif Compute pixel values as a percentage of the
 * display's vertical resolution.
 */
#define V_NORM_PX(v_scr_percent) ((int16_t)((LCD_HEIGHT / 100.0) * (v_scr_percent)))
This gave us a consistent base measurement unit to work with in place of pixels for scale, and maintains the ability to easily vary the scale for different hardware.
4. Use a custom log function
While building a UI with LVGL can sometimes feel like using a toolkit in a higher-level language because of how feature rich and expressive it can be, it will nevertheless remind you, harshly at times, that it’s still C code. That is when things go wrong — say you mishandled a pointer somewhere, which is easy to do with the deep object hierarchy — you’ll find yourself staring at a blank, flickering screen with no clue what happened.
Fortunately, a simple and effective solution exists! Throughout the API, LVGL has log statements that are abstracted away such that you can provide your own log callbacks on initialization. This allows you to show LVGL logs in the same log stream as the rest of your application. A small step that can save a lot of debug time and help catch minor mistakes before they sink more than a single compile-run cycle of your day.
5. Manage LVGL dependency in PlatformIO
For our project, we used PlatformIO on VS Code as our IDE.We found it quite easy to get started with LVGL using PlatformIO’s dependency management system. All we had to do at first was specify
lib_deps = lvgl/lvgl @ ^8.2.0in our platformio.ini file to have PlatformIO pull the library from its registry and configure it in the build automatically.
There was a downside to this, however. We had five different build variants, and PlatformIO downloads a separate copy of all dependencies for each variant when building. For a normal development workflow, this is fine, since it caches them between builds. However, our CI build starts from a new container each run, and would pull five copies of LVGL for every build, which ran on every commit to the repository. Instead, we decided to manage the dependency ourselves by adding it as a git submodule in the lib directory of our PlatformIO project. This is almost as convenient as simply specifying the version in the config, as PlatformIO still recognizes the include and src directories and adds them to the build automatically.
In Summary
We’ve shared five tips for leveraging LVGL and PlatformIO in your embedded UI projects to streamline your development process and enhance outcomes. These insights represent just the beginning of what’s possible when you dive deep into the capabilities of these powerful tools.
Should you find yourself in need of further embedded development expertise, let’s chat. Punch Through is here to help. Our team has a wealth of experience and a passion for innovation in embedded systems. For more resources and guidance, visit our resource hub, where you’ll find a wealth of content to support your development efforts.
Thank you for joining us on this exploration. We look forward to supporting your journey towards creating exceptional embedded UIs.